VW Audi Generation 5 Haldex Fault Finding Repair Guide
Applicable Vehicles
The list below shows the vehicles which are fitted with a Generation 5 Haldex Controller.
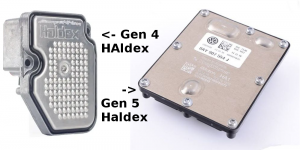
This list is not definitive, and be cautious on the dates as cars around the change over date may have ether Gen 4 or Gen 5. Please check by comparing the picture to the right of the Gen 4 v’s Gen 5 control unit to see which system is fitted to the vehicle. Mixing up repair information is common and leads to misdiagnosis, and incorrect parts orders. So check and be sure which one you have! Generation 5 Haldex is fitted to the following VAG group 4wd vehicles (and also some of their 2wd vehicles which will be discussed elsewhere!):-
- Audi A1 2015 onwards
- Audi A3 S3 RS3 / Sportback 2013 onwards
- Audi A3 Cabriolet 2014 onwards
- Audi Q3 2012 onwards
- Audi TT / TTS / TTRS Coupe/Roadster 2014 onwards
- Volkswagen Golf / Golf R / 4Motion 2013 onwards
- Volkswagen Passat / 4Motion / Santana 2015 onwards
- Volkswagen Sharan / syncro / 4Motion 2012 ownards
- Volkswagen Tiguan 2013 onwards
- Seat Alhambra 2012 onwards
- Seat Leon / Leon 4 2013 onwards
- Seat Altea Freetrack 2014 onwards
- Skoda Octavia / Scout 2013 onwards
- Skoda Yeti 2013 onwards
Generation 5 Haldex System
Generation 5 Haldex is the most simplified and cut back Haldex system to date, it has less components than ever before and is the lightest generation so far. A cynic might say the most “cost effective” system to manufacture! We are being inundated with customers contacting us with low mileage vehicles, around 15k to 30k miles and only 3 to 5 years old, where the 4wd system no longer works.
Often they have been given astronomical quotes from main dealerships or aftermarket garages for potential repair quotes, usually in the region of £1500 to £3000 is common depending on what parts the garage is guessing at replacing!
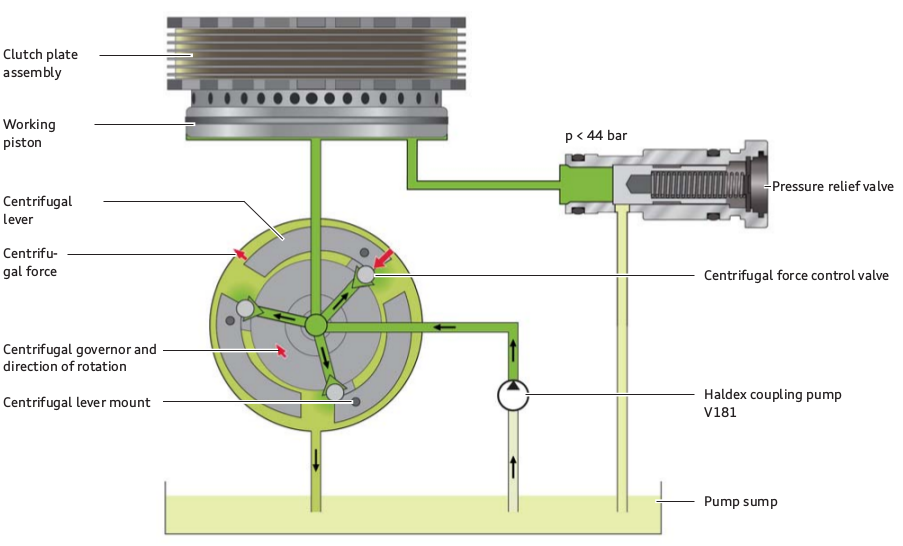
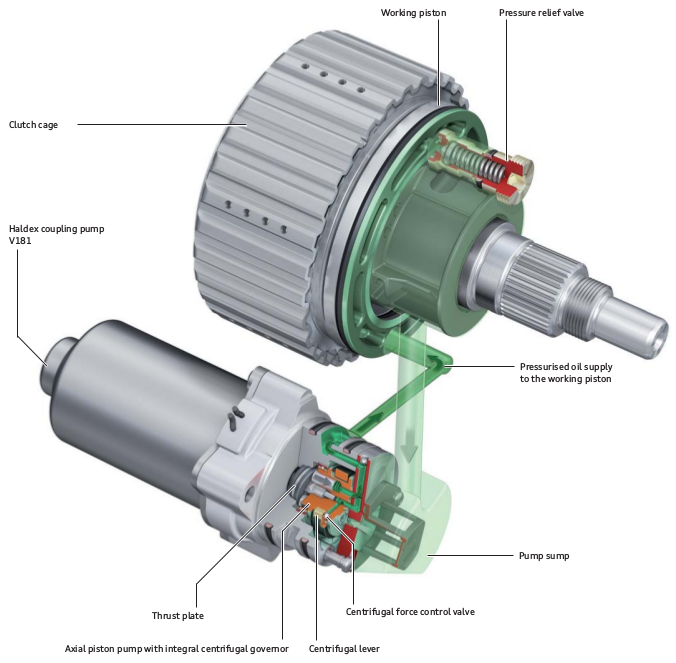
The system really only has a few components, as seen on the diagram. There is a control unit which powers a pump – which is fitted with a strainer gauze, when pressure is made the piston applies force to the clutch pack which engages the 4wd. There is a pressure relief/blowoff valve which vents any excess oil pressure. And that is about all there is! There is no fine particle filter cartridge like the previous systems, which we suspect is the main cause of early failure. There is no “n373 Valve for Controlling Clutch Operating Angle”, nor any pressure sensors. Any pressure values shown on the diagnostic equipment measuring blocks like VCDS is purely estimated and calculated, thus they are purely fictitious.
Common Problems and Fault Codes
Often customers complain about no drive to the rear wheels, and typically there are no warning lights or error messages shown on the dashboard to illustrate the system is faulty, thus owners are unaware of the issue. Buyers of second hand cars often purchase these cars not working, so they never know any different. Only when it comes to winter time where they get stuck somewhere they then realise the rear wheels are not turning. With the more performance orientated cars such as Golf R, RS3, S3, TTS or TTRS, the lack of 4wd is more apparent as brisk acceleration usually causes the traction light to flash and power be limited – accompanied by lots of wheel spin, especially on wet roads or slippy surfaces.
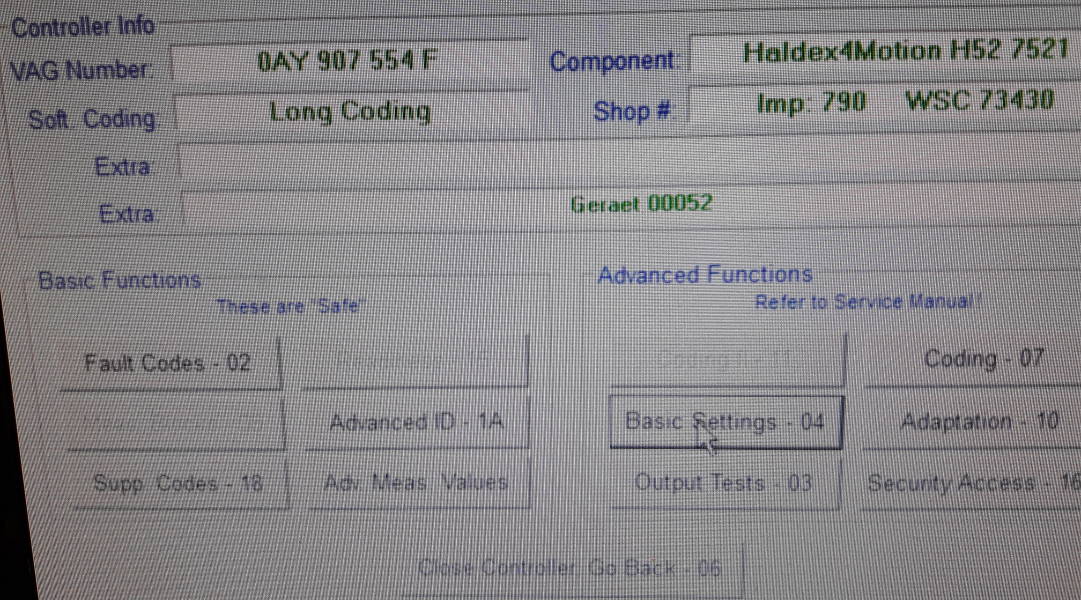
When scanning the vehicle for fault codes, it is important to use some decent scanning system which can actually communicate with the Haldex control module which is “22 AWD”, otherwise you will find there are no fault codes stored! People often fall into this trap with cheap OBD2 code readers or phone apps. Fault codes which often occur are:-
- 131599 – All Wheel Drive Clutch – U0114 00 [009] – No Communication (typically ECU fault)
- 131599 – Control Module for All Wheel Drive Clutch – C1113 07 Intermittent error (typically ECU fault)
- 16670 – All-Wheel Drive – C1113 07 [008] – Mechanical Failure (typically pump type fault OR/AND transfer box)
- 16671 – Pump for Haldex Clutch – C1112 04 [008] Internal System Fault (faulty pump AND ecu needs repair)
- 16671 – Haldex clutch pump Faulty – C1112 04 passive/sporadic (faulty pump AND ecu needs repair)
- 16668 – Pump for Haldex Clutch C1112 07 [008] – Mechanical Failure Intermittent (typically Pump fault)
- 16666 – Pump for Haldex Clutch C1112 13 [008] – Open Circuit(typically pump type fault)
- 16664 – Pump for haldex clutch – C1112 11 – short to ground
- C111307 – Mechanical Malfunction – Passive / Sporadic (typically blocked pump, clean out and relearn or transfer box)
- 17460 – Internal Control Module Memory Check Sum Error – B2000 98 Component or System over Temperature – Steuergerat defekt Temperatursensor Kupplungstemperatur Short circuit (Control unit faulty)
16671 – Pump for Haldex Clutch – C1112 04 [008] Internal System Fault OR ” C111204 Haldex Clutch Pump, Defective “
The ISF (internal system fault) is caused when the pump is defective, but sometimes when fitting a new pump you find the 16671 code will come back every time you clear it. This is a software fault in the Gen 5 control unit. Most of the time no amount of doing the “Pump Learn” will fix this, some will clear after the learn but most will not. There is an internal system table that is used by the firmware to calibrate the controller current/voltage sensing system. When this data is outside of certain values the ISF fault is triggered. A defective pump causes this problem.
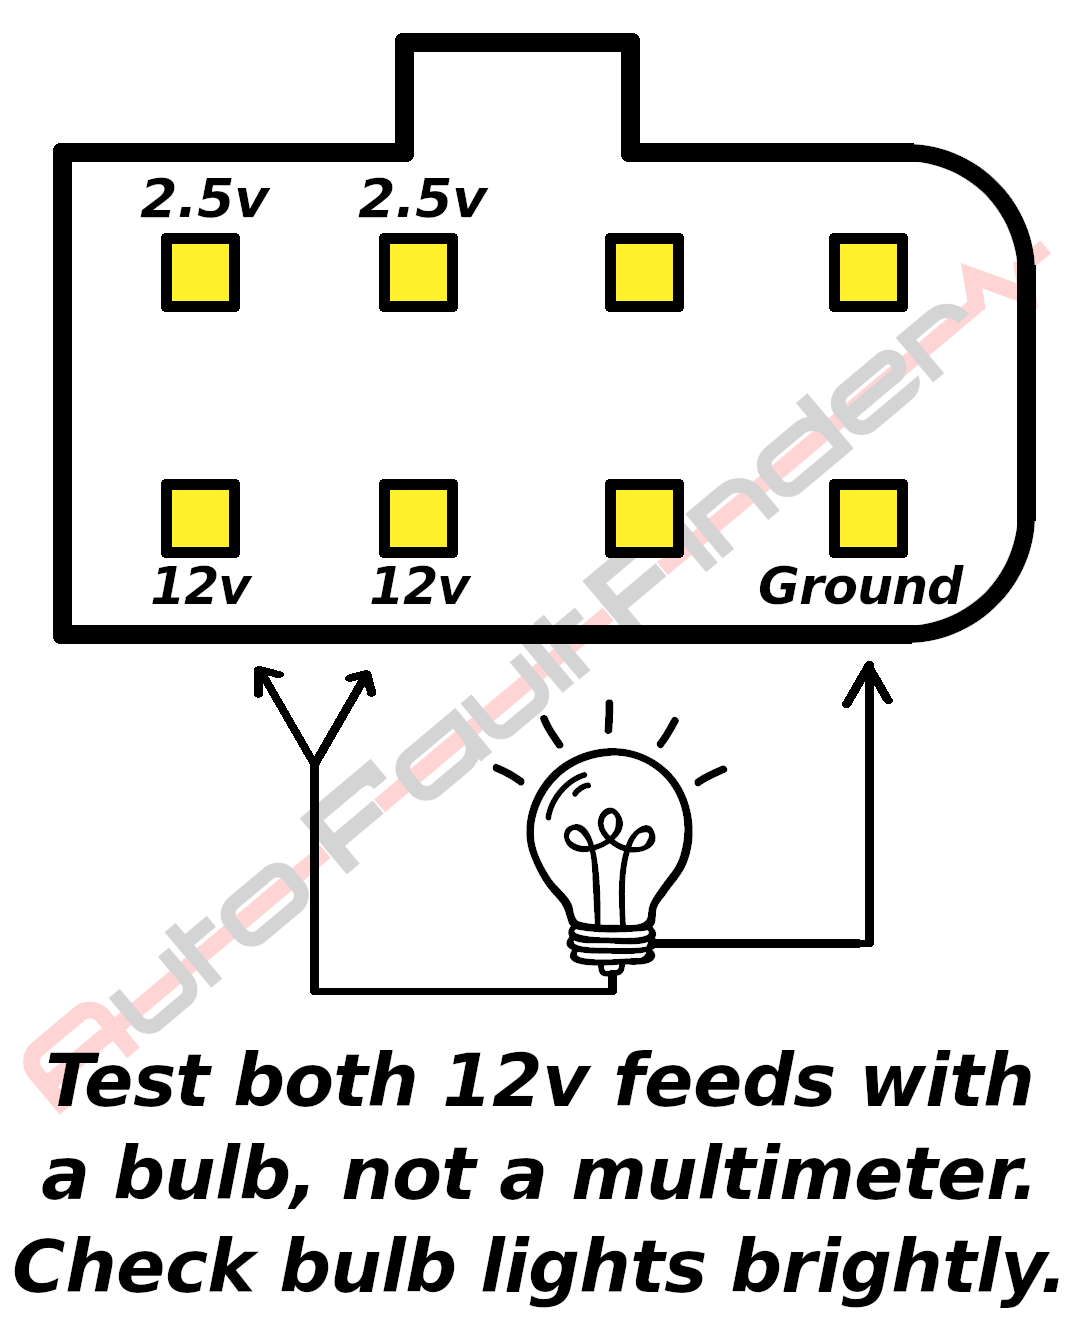 The 16671 code can also be caused by a poor power supply to the Haldex controller. There are 2 x 12v supplies to the controller.
Test both with a 12v bulb as it provides a load test, do not use a multimeter as even with poor connections or corroded pins you will still get a 12v reading.
The most common cause of no supplies are either a blown fuse (again there are 2 fuses for all gen 5 Haldex VAG cars)
Or there is a connector under the back seats, under the plastic fuel tank access covers, it is a 6 pin connector block with only 5 pins populated. Check and inspect this!
We also stock genuine Borgwarner Gen 5 Haldex Pumps on our website as a single item, or as part of a Haldex Pump Bundle Kit, which includes Febi Bilstein Haldex oil, syringe and filling pipe which you can find below:
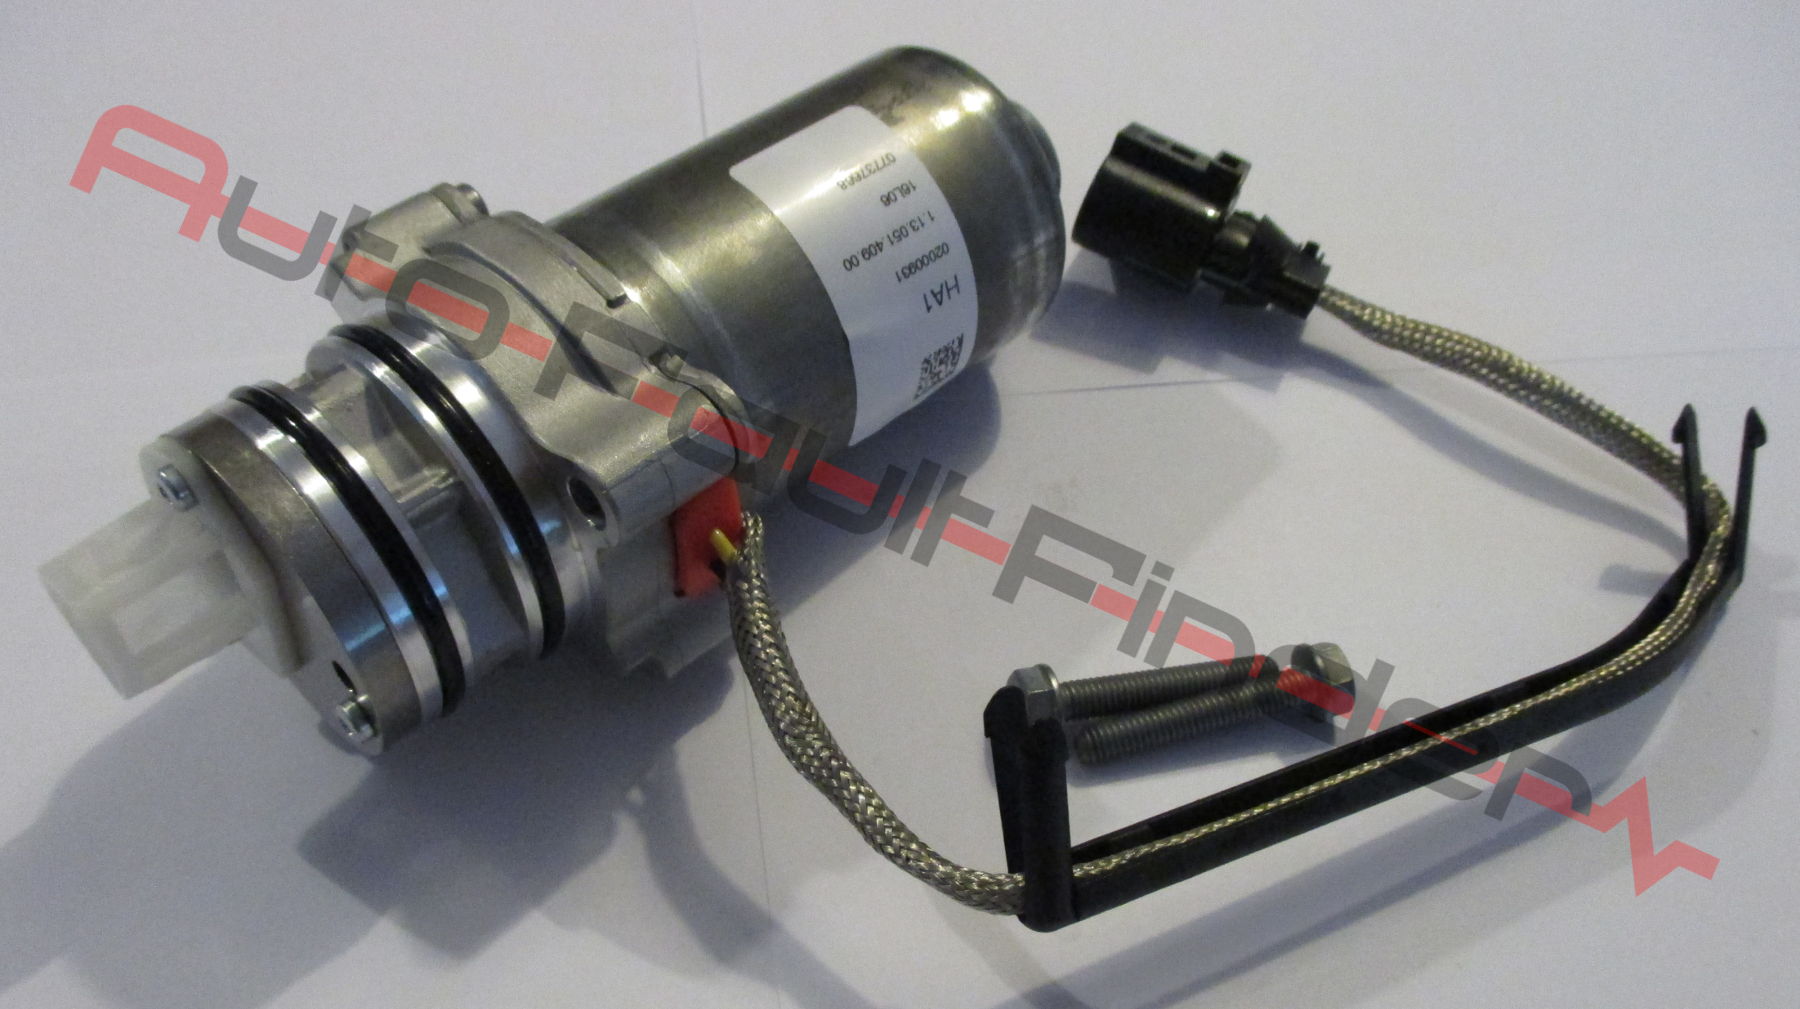
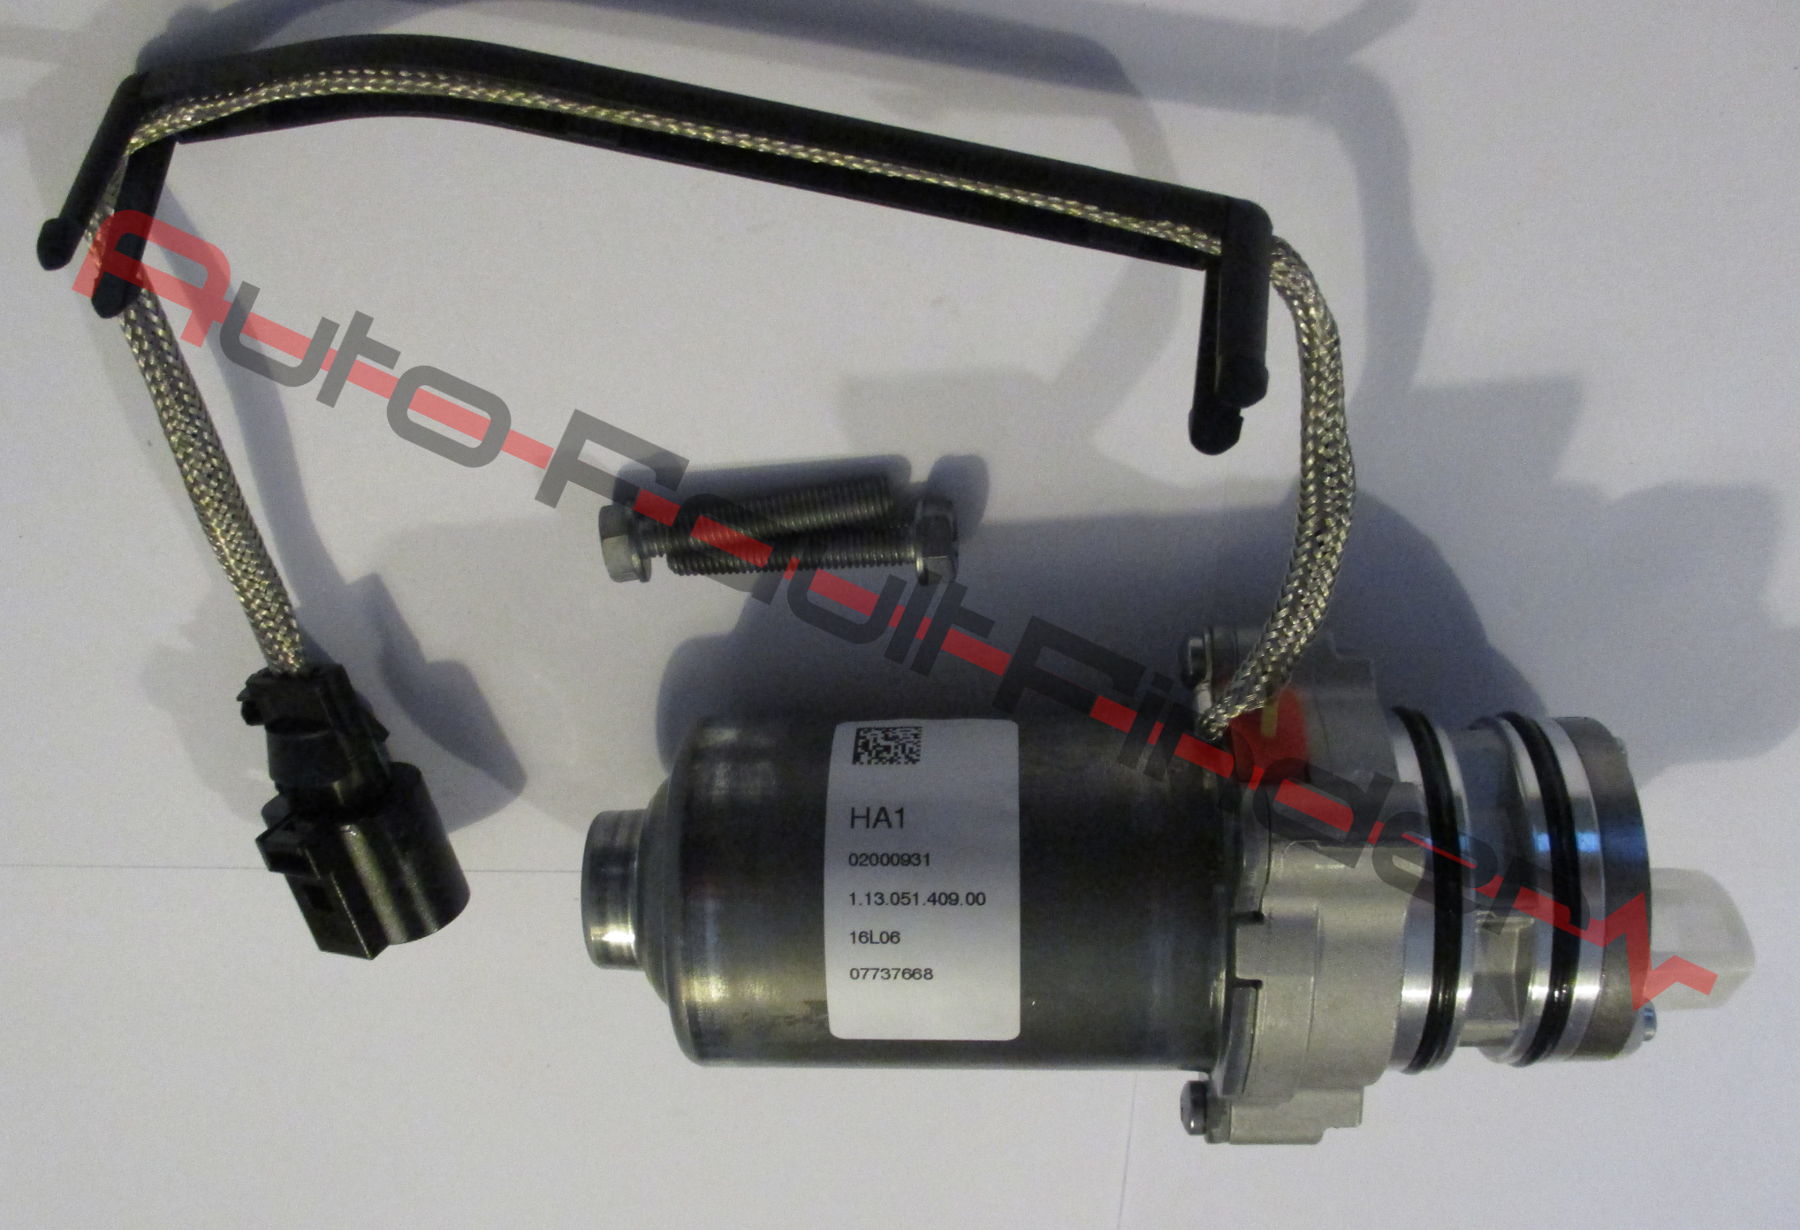
Generation 5 Haldex Pump 0CQ598549 for VW Audi Seat Skoda
Generation 5 Haldex Pump 0CQ598549 for VW Audi Seat Skoda

Gen 5 Haldex Pump Replacement Kit for VW Audi Seat Skoda 0CQ598549
Gen 5 Haldex Pump Replacement Kit for VW Audi Seat Skoda 0CQ598549
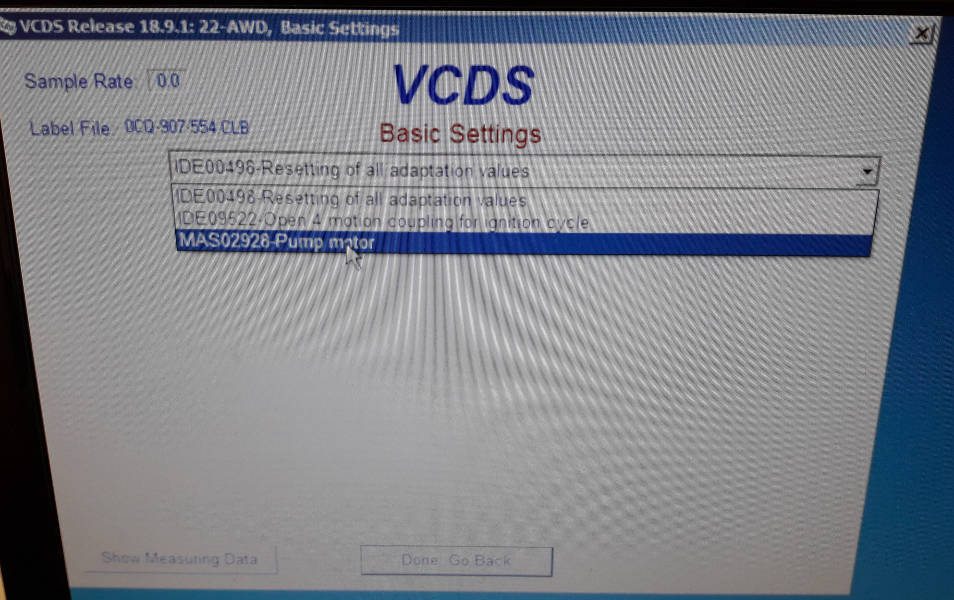
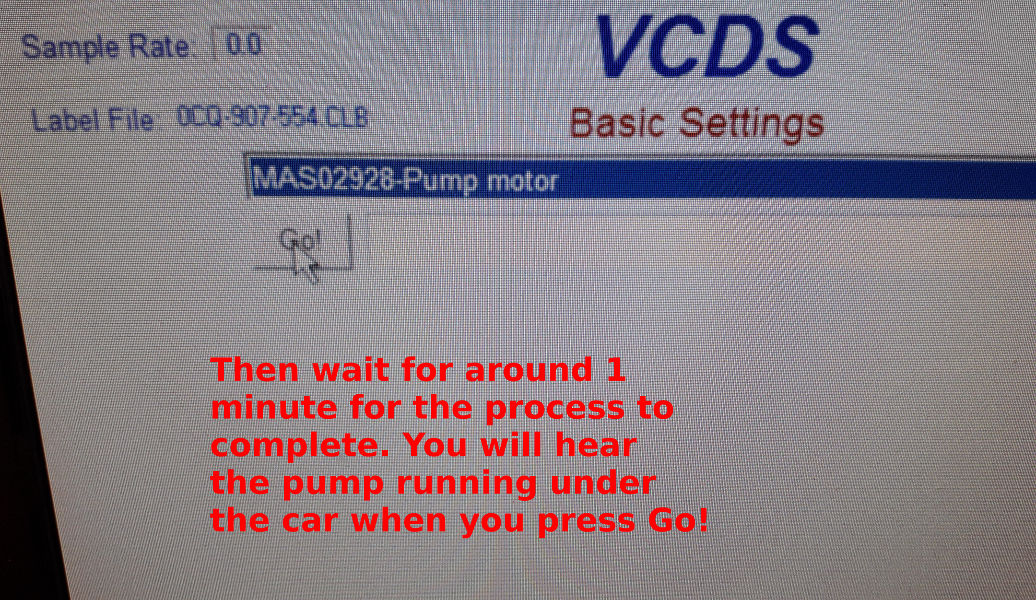
Pump Learn Function
It is common for owners to have a new pump fitted by a garage or main dealer and still the problem persists. When fitting a pump, or even just after a clean out and service it is essential to carry out the “pump learn” function in the “basic settings” of the Haldex control unit, VCDS/VAGCOM can do this and so can the main dealer ODIS system. Customers are often told there is “no adaption” or programming required to fit a new pump, this is incorrect!
The control unit learns how much power is required to run the pump until the pressure hits a certain threshold, it does this by monitoring how much current is consumed by the pump, when the pump is blocked, or faulty, the control unit learns/adapts some very low values which means when the Haldex controller tried to engage the pump, it does not supply enough power to make it engage. By carrying out the learn function when fitting a new pump, it will learn the correct power values and thus engage the system correctly.
Literally multiple times a week we get customers calling who have had new pumps fitted, often by main VW, Audi, or Skoda dealership, yet the system still does not work and they will not perform the pump learn process. Instead they then quote the customers on a brand new ECU/Haldex Controller, or they quote them on a complete new coupling/rear diff, plus labour. There is no documentation we know of in the “VAG Self Study Guides” / VAG workshop manuals that have any reference to the Pump Calibration / Learn function.
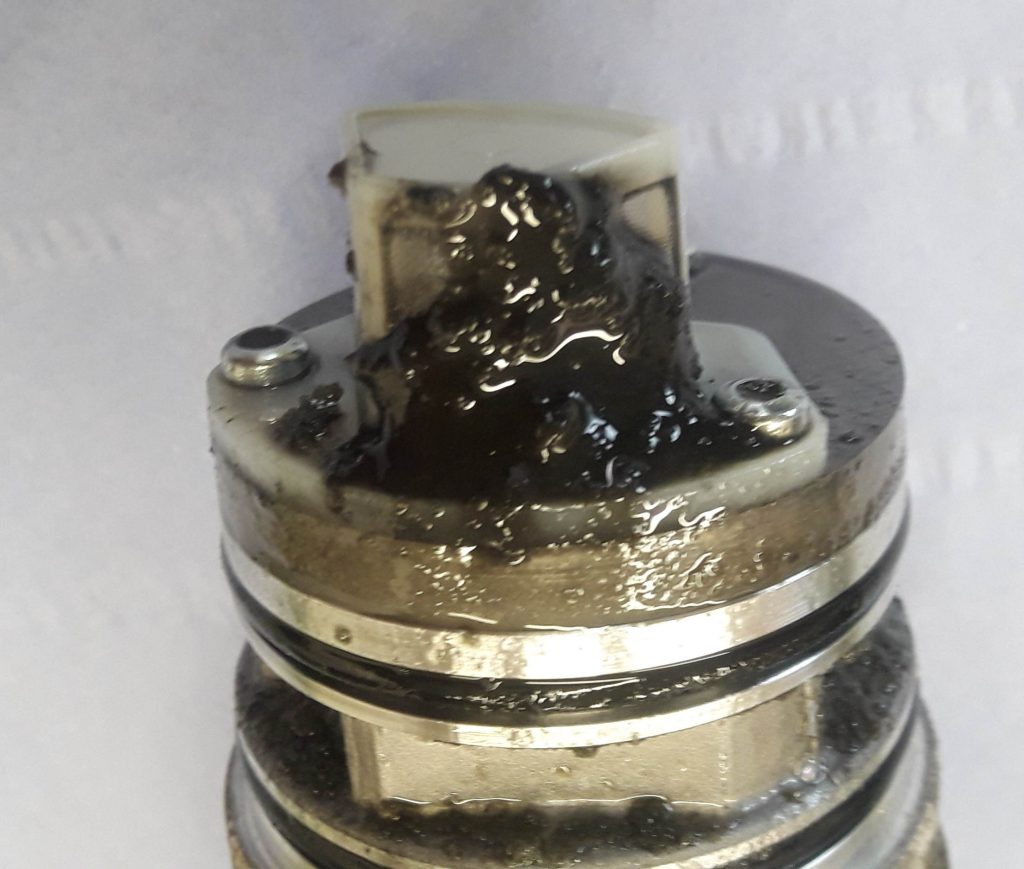
Very very rarely, the pressure relief blow off valve will stick open, this will cause the coupling to not engage 4wd as there is no oil pressure there to clamp the clutch plates together. We have brand new valves in stock, they are easy to replace and not very expensive.
Essentially what the learn function does, and you can listen to the pump run while it does it; the function ramps up the power to the pump slowly until the pressure hits the 44 bar blow off valve where is senses the drop in current. It does it a few times so the pump knows how much current and voltage it takes to achieve 44 bar. It then saves this value in the calibration values, and after a short drive it then calculates/estimates the 1 bar and 15 bar from the last measured 44 bar value.
AFTER THE LEARN HAS “COMPLETED SUCCESS”, THE VALUES USUALLY SAY “0” UNTIL THE VEHICLE IS TAKEN FOR A SHORT DRIVE, THIS IS DUE TO IT ESTIMATING THE 1 & 15 BAR VALUES FROM USE.
Here are some photos of how to carry out the pump learn function using VCDS VAGCOM
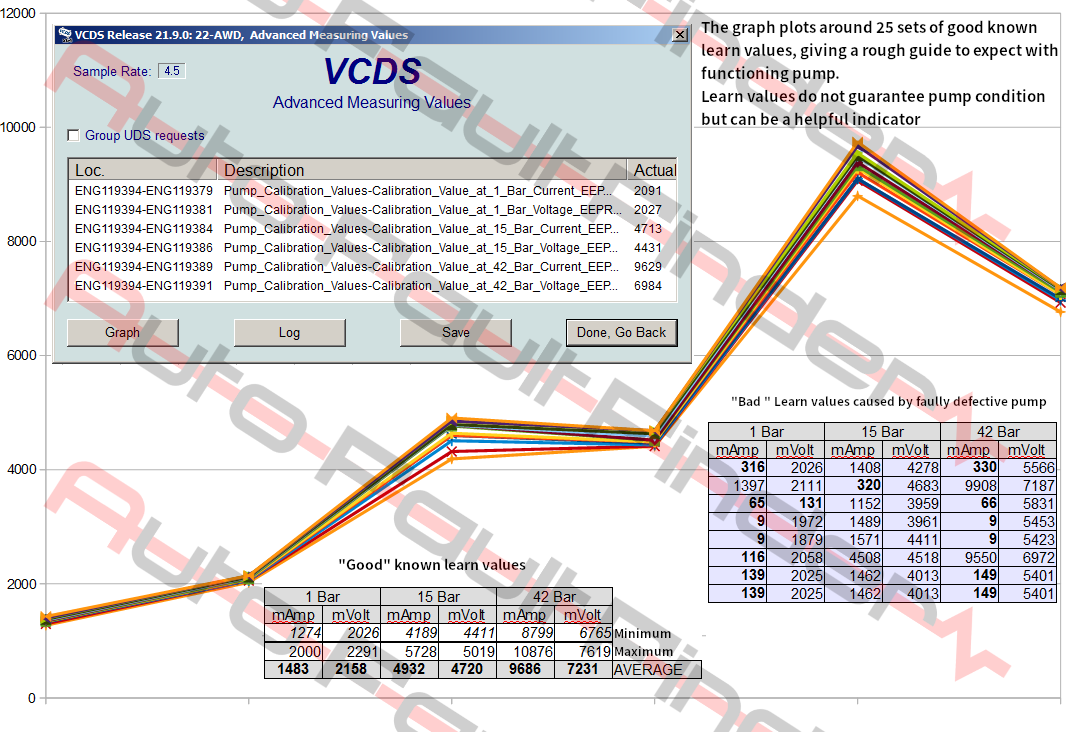
These are good typical learn values below, which can be found in the “advanced measuring values” on VCDS and other tools like Vag-CAN Pro etc. If the values are wildly different then more than likely the pump is no good. This is an indicator of a defective pump.
This image shows good known Pump Calibration Learn Values, and Bad learn values. Also there is average values, and minimum/maximum values which have been taken from a large sample of good working vehicles. Bad learn values are a good indicator for a failed pump, but good values do not guarantee a healthy pump although is a rough tool to use for fault finding.
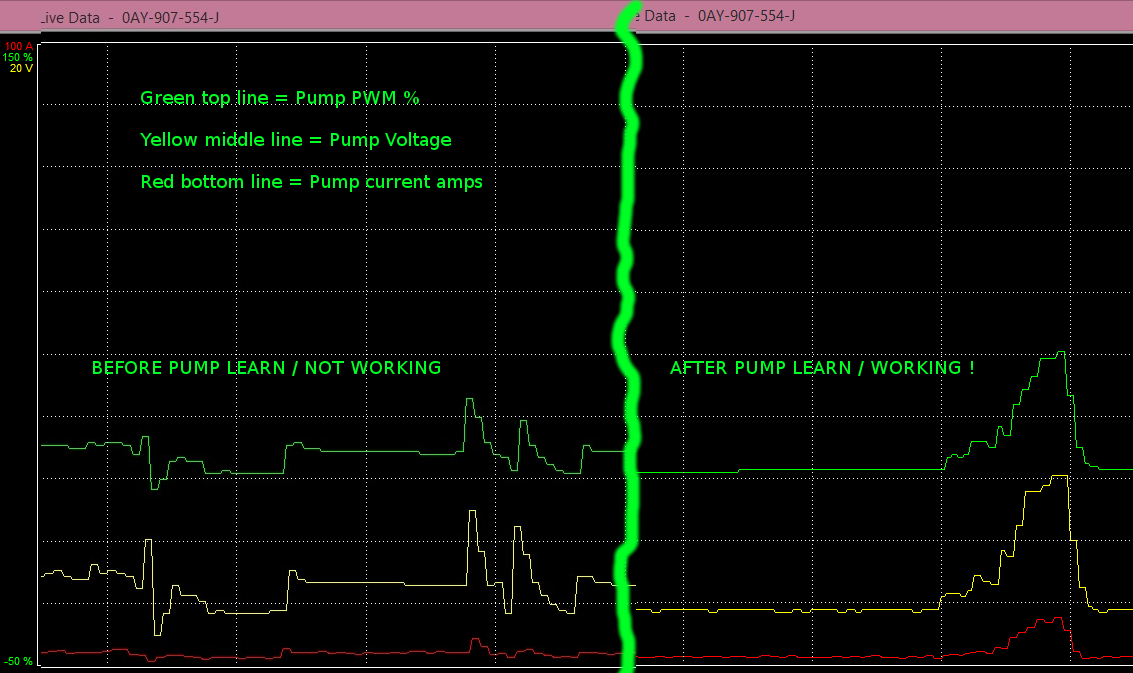
If you have a system that is not working, a good starting point is to data log some of the measuring blocks for the pump control, these are the Pump PWM %, Pump current and Pump Voltage. Take the car somewhere that it can be launched to hopefully cause wheel spin somewhere safely and legal while data logging these values. This image is of a system before and after the pump learn function, as you can see there is almost twice the voltage and current being measured at the pump, and the PWM % green trace line shows the control unit is driving the pump harder thus the larger Voltage and Current values.
Understanding How & What The Pump Learn Function Does
Haldex Oil Change Guide
These Generation 5 Haldex systems have never been serviced correctly, many aftermarket VAG specialists are offering far better servicing where the pump is removed and cleaned which puts them in a far better position but still trouble often persists. Servicing is often not the solution to problems, it is more preventative maintenance.
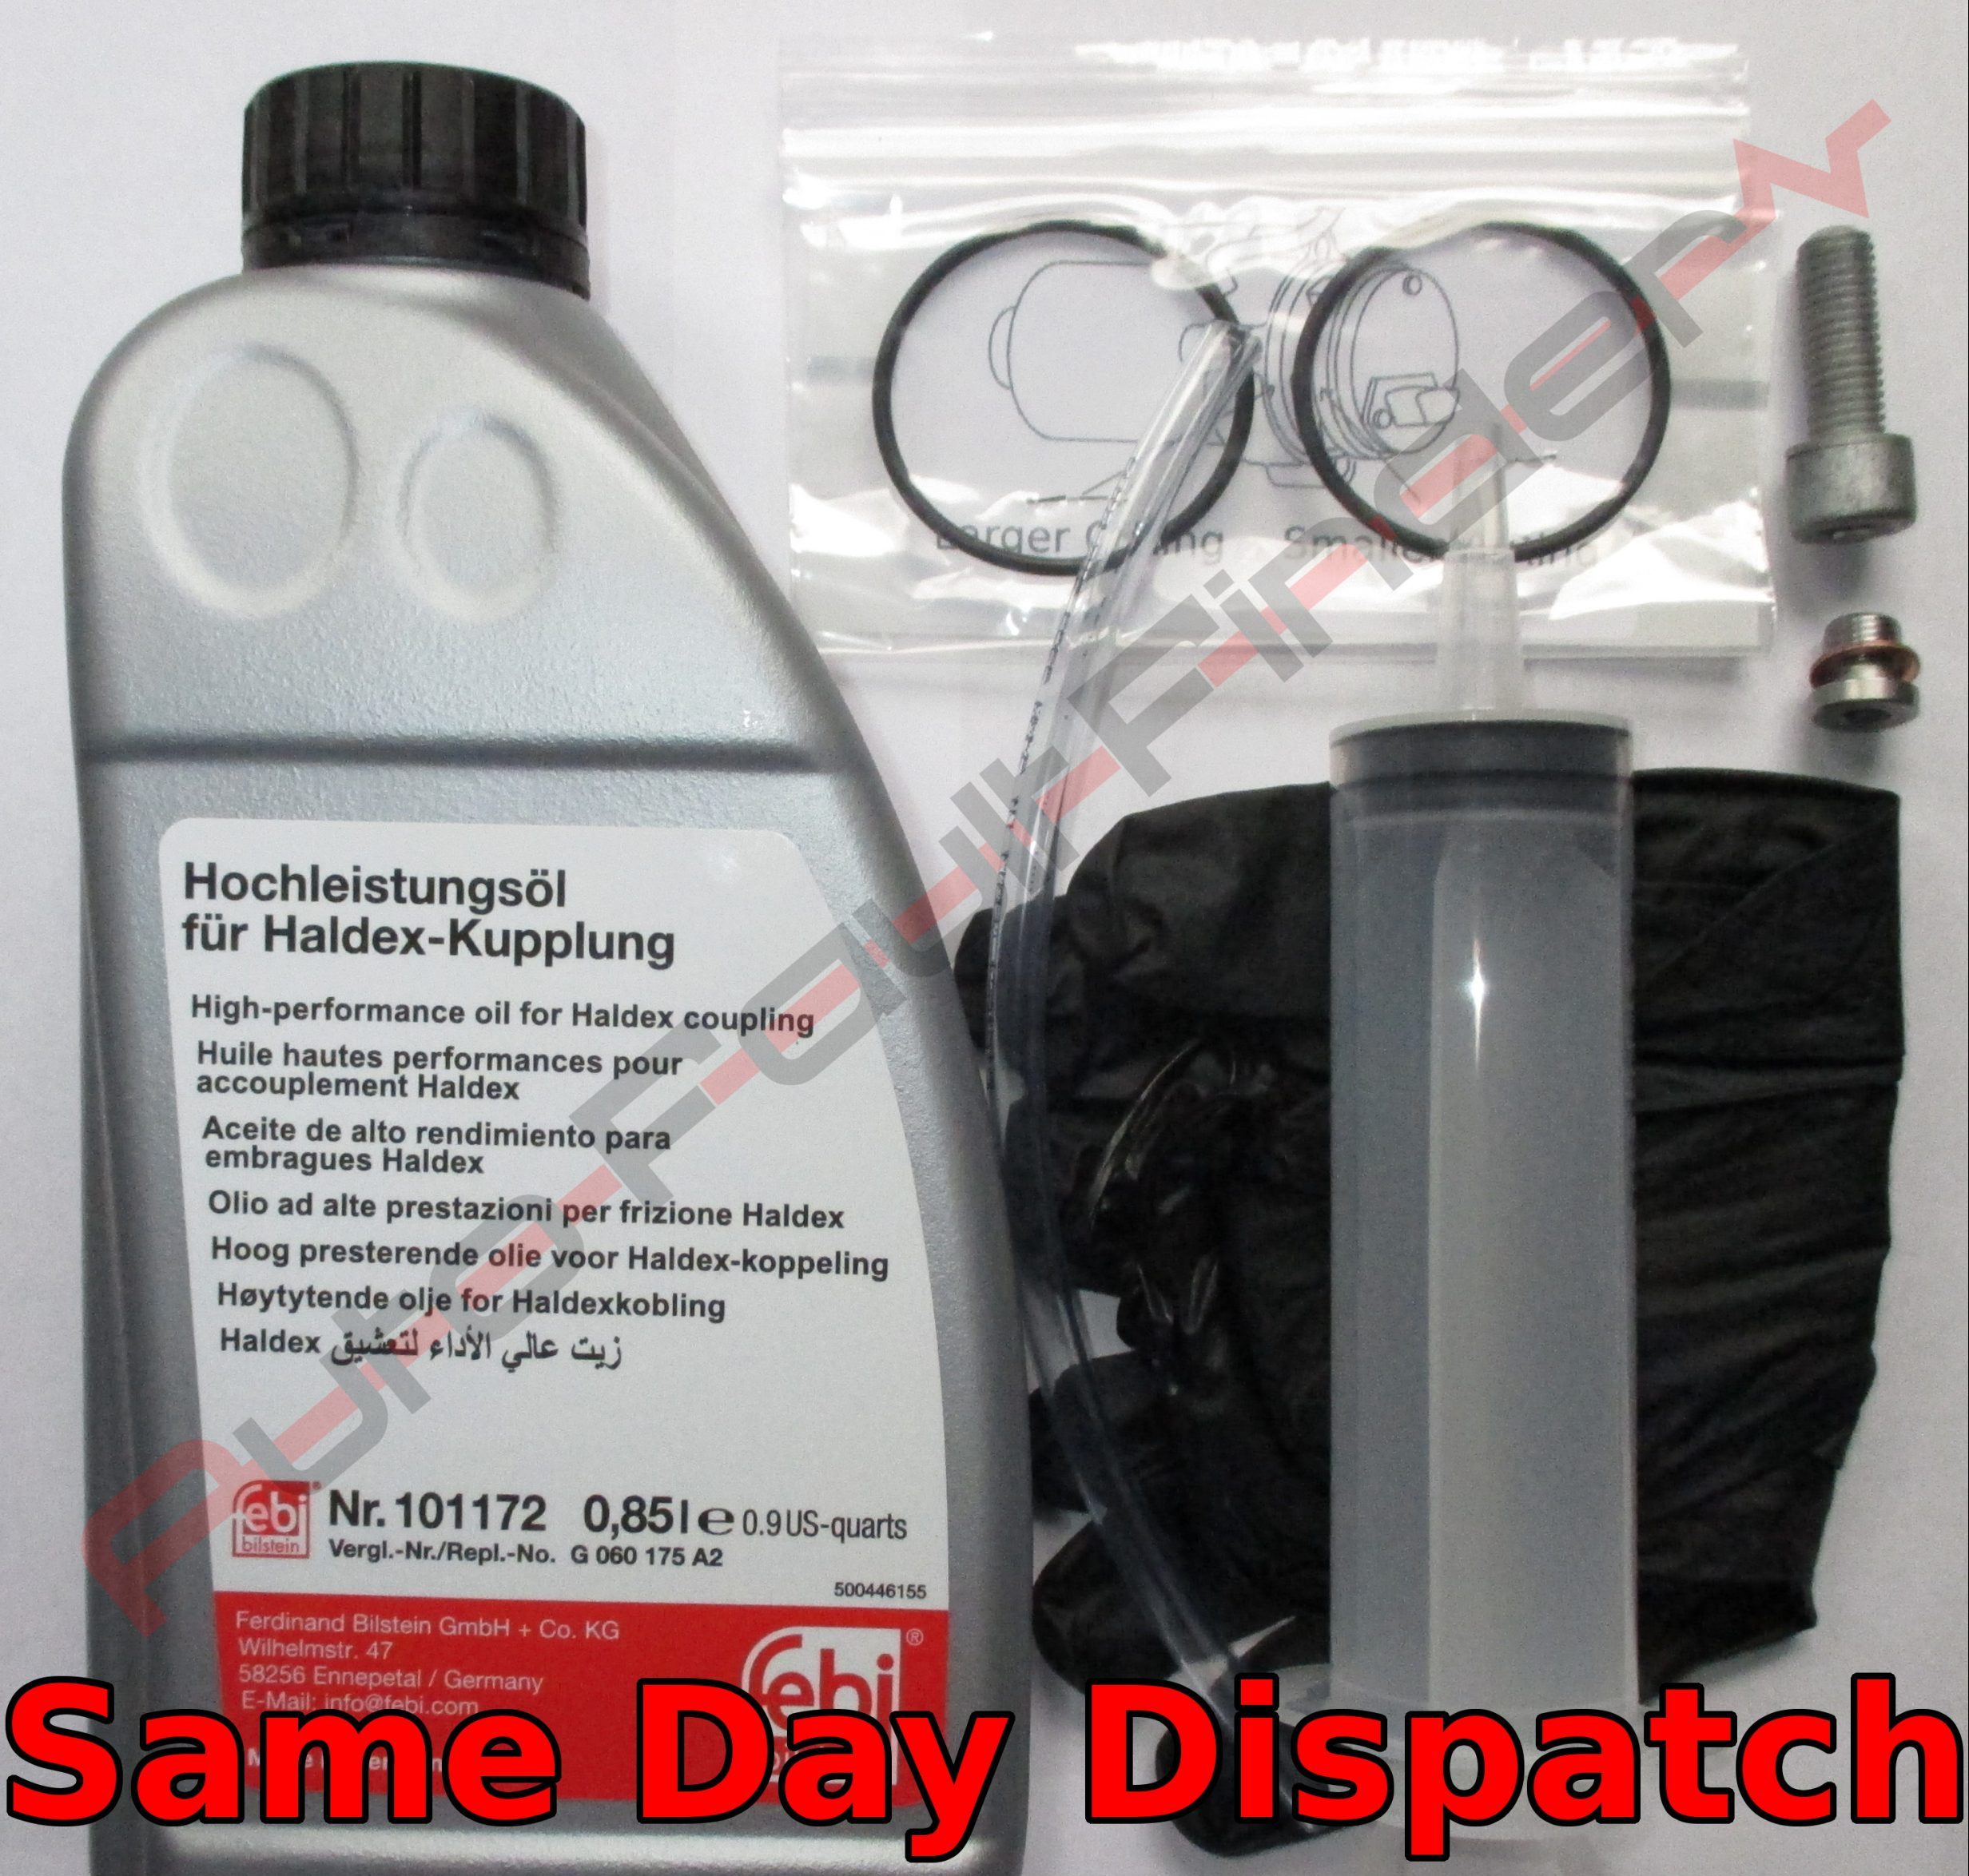
Gen 5 Ultimate Service Kit for VW Audi Seat Skoda
Gen 5 Ultimate Service Kit for VW Audi Seat Skoda
Gen 5 Haldex Pump Replacement Kit for VW Audi Seat Skoda 0CQ598549
Gen 5 Haldex Pump Replacement Kit for VW Audi Seat Skoda 0CQ598549
Watch this Youtuber replace the pump on a MK7 VW Golf R using one of our pump kits!
Oil Change Best Practice
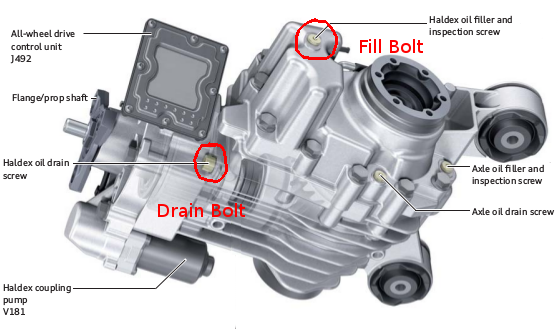
- When doing an oil change, remove the pump, remove the fill bolt and drain bolt.
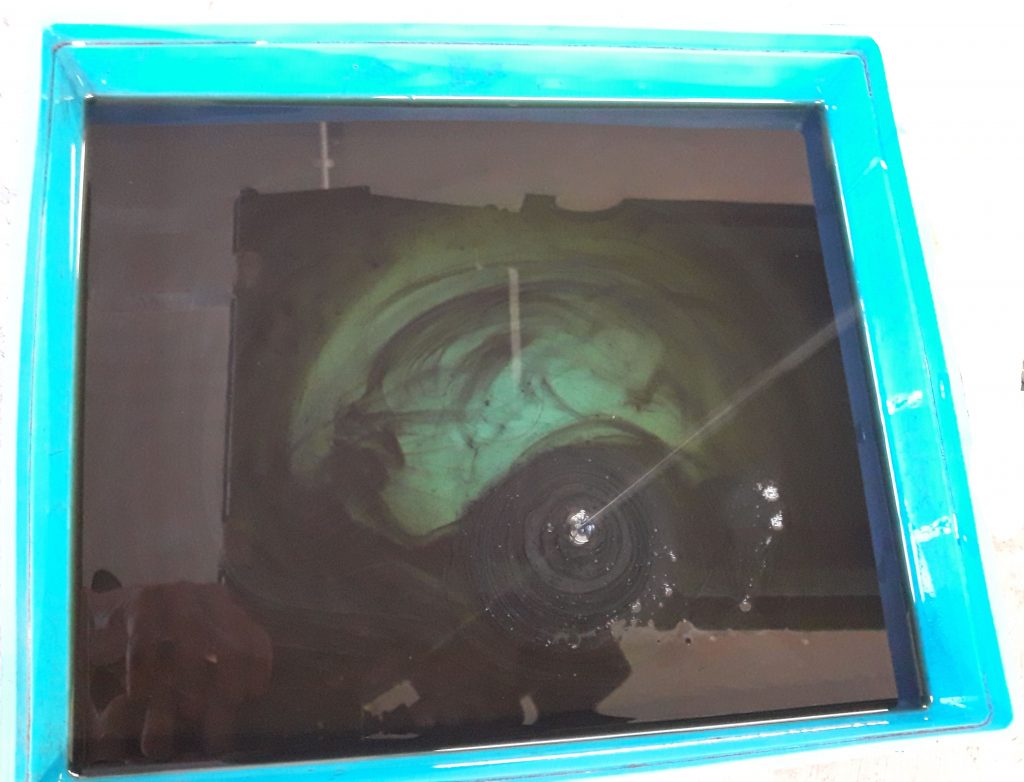
- Wash out the sludge out of the coupling by blowing compressed air into the fill plug with the drain undone.
- Add a little clean oil to wash out the last of the sludge and blow out again.
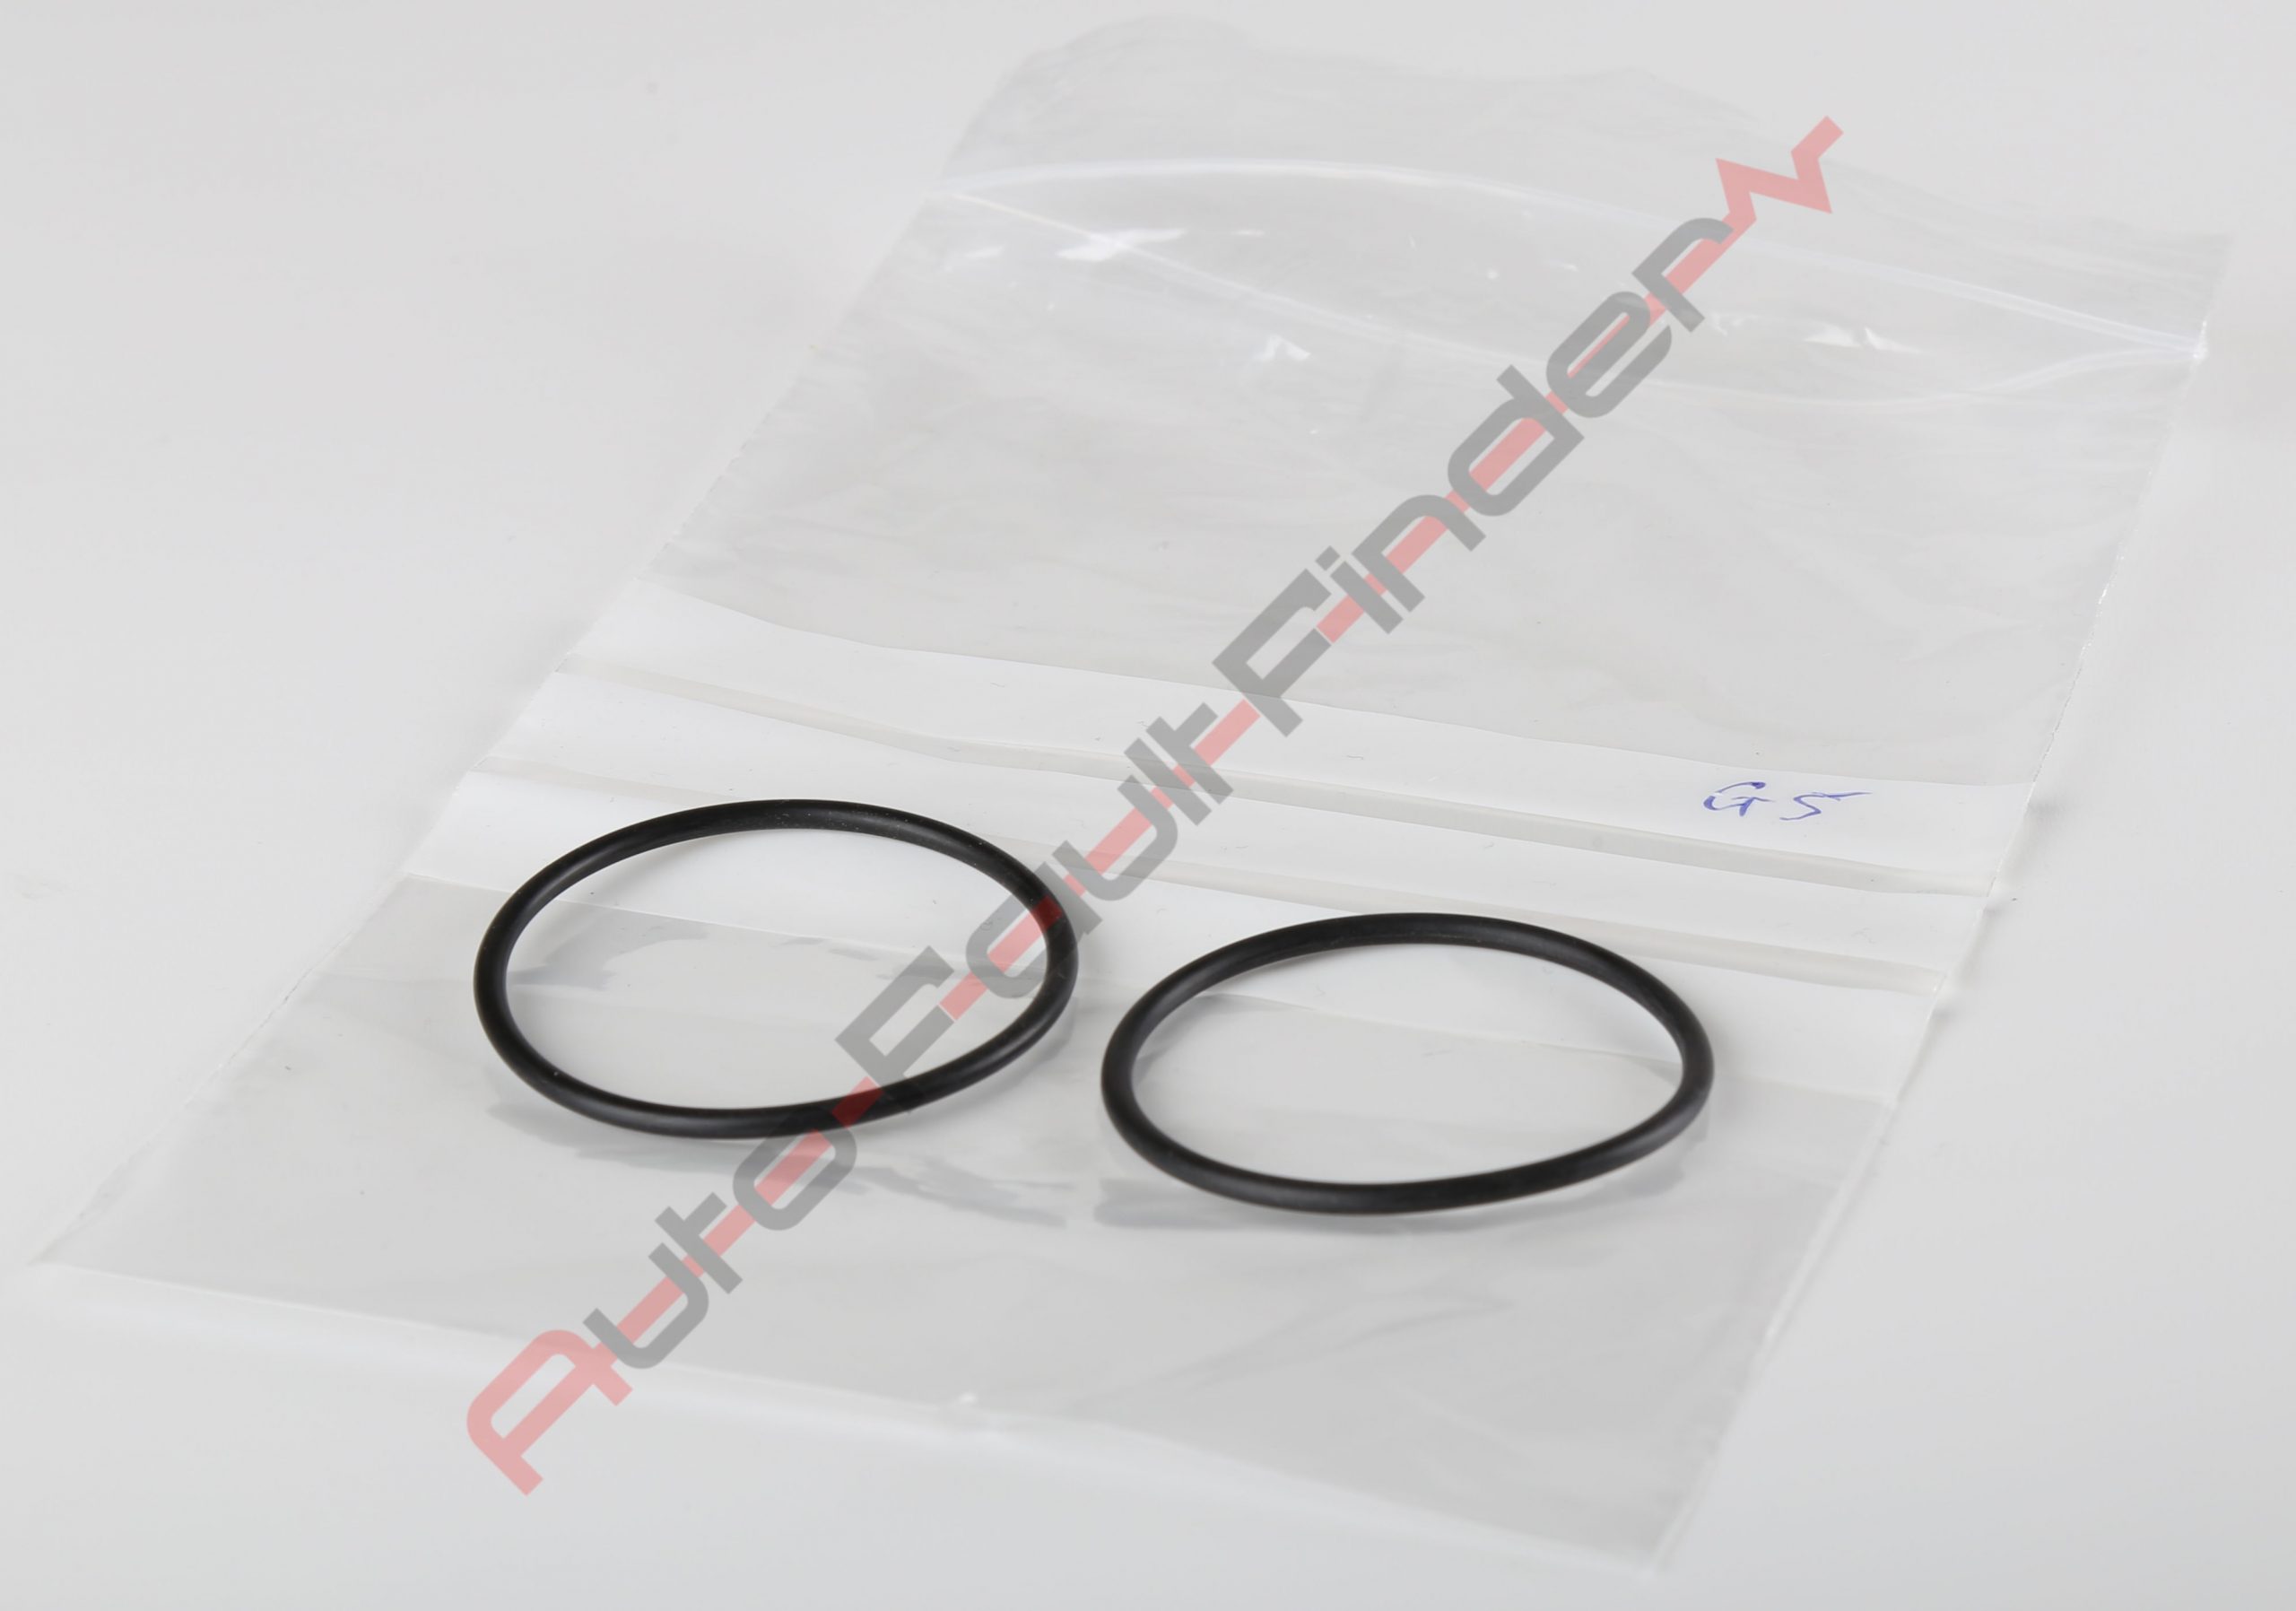
- Blow the pump gauze clean with compressed air, refit the pump with new oil seal O rings with a little oil, refit the drain bolt.
- Fill will Haldex fluid via the fill bolt until oil over spills. Refit the fill plug and clean up any mess.
Transfer Box Test
Lift the car so ONLY the front wheels are off the ground.
Get somebody or a camera to watch the prop shaft.
Someone else to sit in the car, starts up the engine.
Apply foot brake, remove handbrake, put vehicle into drive gear.
Then very gently lift your foot off the brake so the front wheels start to turn.
Prop shaft is stationary = transfer box is faulty.
Prop shaft rotates = a Haldex issue.
This is a really good video (not made by us) showing how the transfer boxes fail inside
Gen 5 Haldex Controller ECU Fitment and Compatibility List (note Auto/DSG/Manual not interchangeable)
| Part Number | Software | Hardware | Vehicle Application | Flash |
| 0AY907554F | Sw 7521 | hw52 | 2012-17 Tiguan, 2016-20 Caddy, Sharan, 2015-18 S1, 2014-18 Yeti, 2014-18 RSQ3 | BIN |
| 0AY907554J | Sw 7522 | hw52 | 2012-17 Tiguan, 2016-20 Caddy, Sharan, 2015-18 S1, 2014-18 Yeti, 2014-18 RSQ3 | NO |
| 0AY907554J | Sw 7531 | hw52 | 2012-17 Tiguan, 2016-20 Caddy, Sharan, 2015-18 S1, 2014-18 Yeti, 2014-18 RSQ3 | FRF |
| 0AY907554J | Sw 7540 | hw52 | 2012-17 Tiguan, 2016-20 Caddy, Sharan, 2015-18 S1, 2014-18 Yeti, 2014-18 RSQ3 | FRF |
| 0AY907554M | Sw 7542 | hw55 | 2012-17 Tiguan, 2016-20 Caddy, Sharan, 2015-18 S1, 2014-18 Yeti, 2014-18 RSQ3 | FRF |
| 0AY907554M | Sw 7543 | hw55 | 2012-17 Tiguan, 2016-20 Caddy, Sharan, 2015-18 S1, 2014-18 Yeti, 2014-18 RSQ3 | FRF |
| 0CQ907554 | Sw 7056 | hw52 | MQB Cars e.g. Golf, A3, 2018+ Tiguan, 2019+ Yeti, TT, Pasat etc | FRF |
| 0CQ907554D | Sw 7076 | hw52 | MQB Cars e.g. Golf, A3, 2018+ Tiguan, 2019+ Yeti, TT, Pasat etc | FRF |
| 0CQ907554D | Sw 7080 | hw52 | MQB Cars e.g. Golf, A3, 2018+ Tiguan, 2019+ Yeti, TT, Pasat etc | FRF |
| 0CQ907554D | Sw 7082 | hw52 | MQB Cars e.g. Golf, A3, 2018+ Tiguan, 2019+ Yeti, TT, Pasat etc | FRF |
| 0CQ907554H | Sw 7083 | hw52 | MQB Cars e.g. Golf, A3, 2018+ Tiguan, 2019+ Yeti, TT, Pasat etc | FRF |
| 0CQ907554J | Sw 7084 | hw52 | MQB Cars e.g. Golf, A3, 2018+ Tiguan, 2019+ Yeti, TT, Pasat etc | FRF |
| 0CQ907554C | Sw 7756 | hw52 | RS3, TTRS, 2019+ RSQ3, Q2, TTS (drive select functions) | FRF |
| 0CQ907554C | Sw 7755 | hw52 | RS3, TTRS, 2019+ RSQ3, Q2, TTS (drive select functions) | FRF |
| 0CQ907554K | Sw 7762 | hw55 | RS3, TTRS, 2019+ RSQ3, Q2, TTS (drive select functions) | NO |
| 0CQ907554L | Sw 7211 | hw54 | Crafter TGE (unique for these) | BIN |
| 0CQ907554F | Sw 7210 | hw54 | Crafter TGE (unique for these) | BIN |
| 0CQ907554E | Sw 8040 | hw52 | VAQ FWD E-Diff Lock | FRF |
| 0AY907554L | Sw 7620 | hw53 | Transporter (unique PCB for difflock inputs) | FRF |